
Can’t upload images in Magento 2? Here is what to do
In a web store, customers can’t touch and examine goods like they would do it at any brick-and-mortar store. This makes the use of compelling product images immensely important. However, adding or updating the existing images does not always go smoothly. Sometimes you cannot add images at all. In other cases, the image would be added but not displayed at the store-front.
There are several possible reasons why Magento 2 images are not uploading or not showing at the storefront. Here is a list of what you can check to fix the issue and import images successfully.
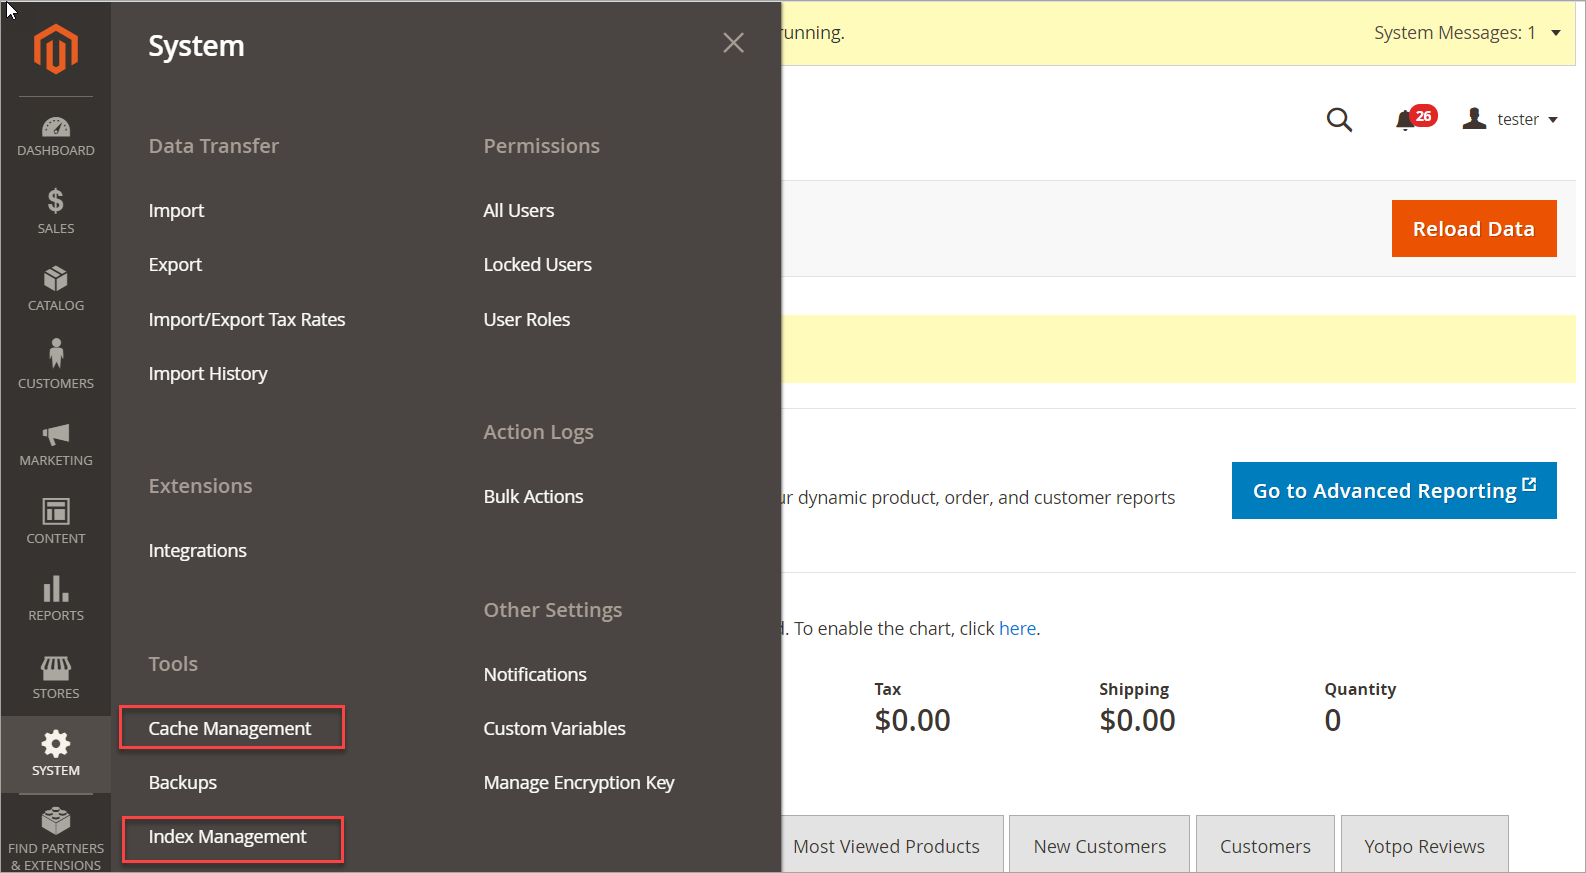
Run re-index and clear cache
After you complete the import, you may find that uploaded images are not visible at the storefront.
The thing is, like other bulk procedures, image upload requires reindex for the changes to be applied. So make sure you refreshed the Magento index after the upload. If Magento 2 images are still not showing, try clearing Magento cache and your browser cache.
To run these commands, go to your Magento 2 admin panel > Menu > System > Tools > Cache Management or Index management:
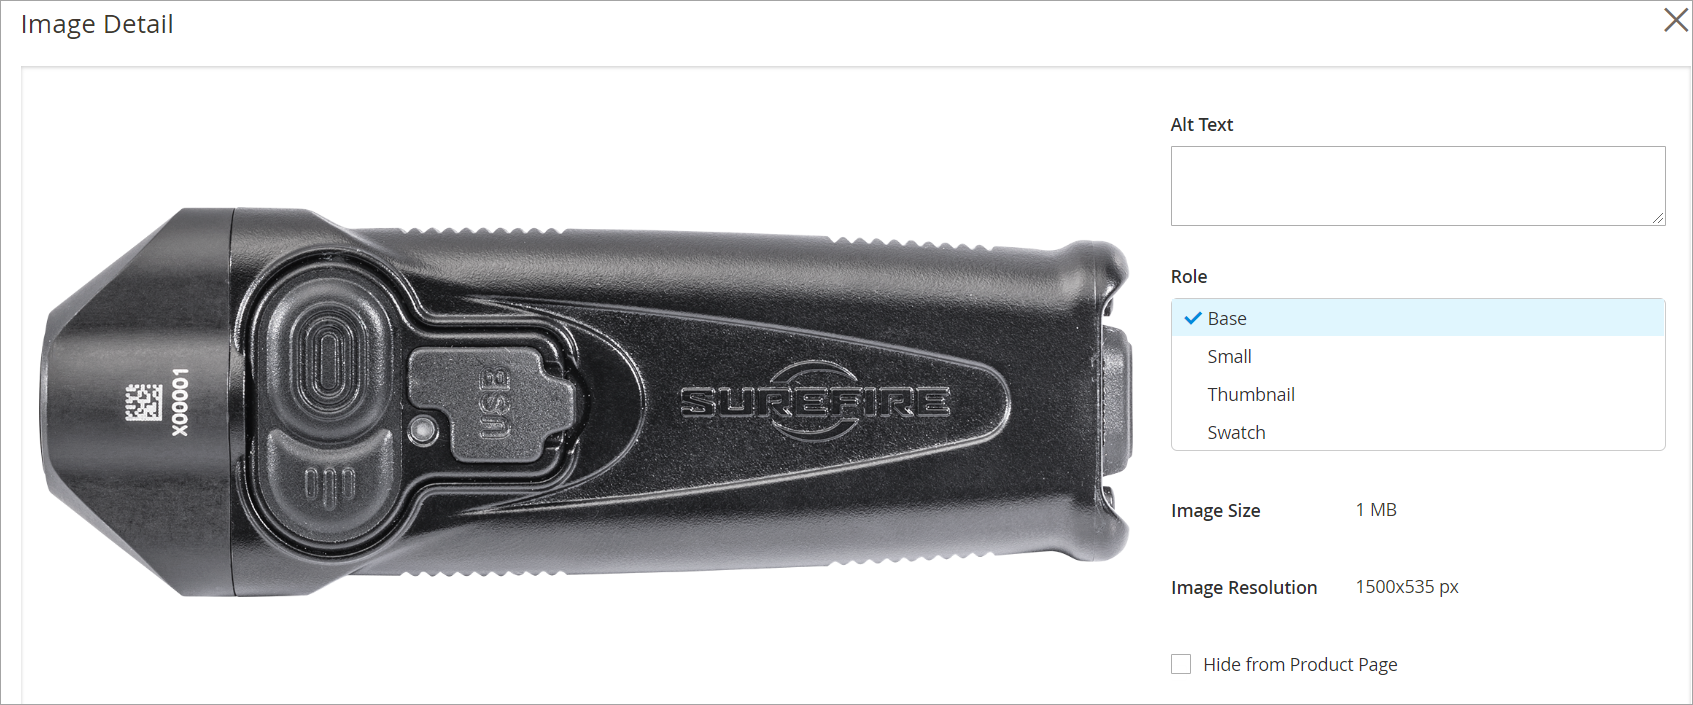
Check if image roles are assigned and images are not “Hidden from a product page”
Images need to have roles assigned to be visible at the storefront. To check the roles, open Product Information > Image Details.
Also, check if the “Hide from Product Page” option is not selected:
If you are adding images via import, make sure your import file contains appropriate column titles for image roles:
- base_image - for base image
- small_image - for a small one
- thumbnail_image - for thumbnail
- additional_images - for all other images separated by a comma: 2.png,3.png,4.png
Check the article on how to import images in Magento2
Check maximum file and post sizes
By default, Magento maximum file upload size is 2M. So when trying to upload bigger pictures, you can get the message: Insufficient max file size and post file size.
Try to optimize your images to make them weigh less. If you, though, need to upload the large image, you have to increase upload_max_filesize and post_max_size in the php.ini file. Mind that some hosting companies don’t allow larger file and post size values so you should better clarify it with your host. Also, you should remember that post_max_size has to be the same or greater than upload_max_filesize.
Check your media folder permissions
To upload images, you must have login credentials and writing permissions to access the Magento folder on the server. In case there are some restrictions, most likely you won’t be able to upload images.
Wrong permission settings can cause the following error messages: "Can not create directory pub/media/tmp" (if there are not writing permissions)
"Imported resource (image) could not be downloaded from external resource due to timeout or access permissions" (if an image is not accessible publicly)
So, check if your media folder is writable and has public access (permission set as 777).
Check if correct media folder is specified and not empty
During import, Magento looks for images in the pub/media/import folder. Starting from Magento 2.3.2, the correct image location for import is: Magento root folder>/var/import/images.
If the folder is empty, your CSV file contains an incorrect path to it, or the images are located in the wrong folder, then you can get this error: Imported resources (image) could not be downloaded from external resources due to timeout or access permissions.
So make sure that images are uploaded into the appropriate folder and if your CSV import file has the correct image path. First, paste the URL of the image on FTP to your browser to see if it is accessible online.
Need to upload images from external URLs? Read how to import images from links to Magento 2 with Store Manager for Magento.
Check if image path in the CSV import file is correct
To get a clue how the path in the CSV should look like, we recommend exporting a product with an image and checking how the path looks like.
Note that Magento 1 and 2 have different CSV file formats:
- Magento 1 – field values could allocate multiple cells in a column.
- Magento 2 – field values can allocate only one cell. To separate multiple values delimiter should be used.
Import Magento 2 images smoothly with Store Manager for Magento Try FREE now!
Change user password
Try to reset your admin user's password. Then login with your new credentials and import images again.
On Magento forum, Magento users mentioned this tip several times. But we didn’t test it ourselves so it’s up to you whether to use it or not.
Check PHP memory limit
An insufficient PHP memory limit can also lead to errors during Magento image upload. Try updating the limit to some larger value and repeat the import to see if it works.
Check if it’s not a bug in Magento 2.x
If you use Magento 2.3 and image upload not working, this may result in such an error:A technical problem with the server created an error. Try again to continue what you were doing. If the problem persists, try again later.

This error might be caused by a bug in Magento. The bug was fixed in the 2.3.1 release.
Increase FTP quota
Check if there is enough space on your FTP for images upload. If you exceed the quota, you will need to delete some images that you may not use anymore. Alternatively, you can enlarge the quota with your hosting company.
Quick checklist if Magento 2 image upload not working
Let’s sum up what you can do in Magento 2 if you can’t upload images:
- Clean and flush cache.
- Run reindex.
- Logout from the backend and log in again.
- Change the user password.
- Check image roles and the “Hidden from a product page” option.
- Increase the maximum file and post size.
- Check if media folder permissions are set to 777.
- Check if the correct media folder is specified in the importer and if the path to the media folder in CSV is correct.
- Increase the FTP quota.
Related Articles:
How to Import Products in Magento 2
A very detailed guide on importing products to Magento 2: step-by-setp tutorial, CSV sample, useful tips. Read More...

Required Magento 2 Import Values
Get deep guide to prepare an accurate CSV for Magento 2 import. Read More...
How to Import Magento 2 Customers
Learn how to upload Magento 2 customers from different file formats (.csv, .xls/.xslx, .ods, .xml and .txt). Read More...
Export All Categories From Magento 2
Check how you can export all Magento 2 categories with products via export assistant. Read More...
COMMENTS